
Your iPhone goes everywhere with you — it’s the most versatile tool you have in your arsenal, as it keeps you connected, entertains you and helps you navigate, but did you know it can also save your life?
Apple bundles several options on the iPhone that can come in handy in an emergency. Your iPhone can automatically alert your closest contacts (or dial the local emergency helpline) when you’re in trouble and can even let first responders access your medical history without unlocking the phone. But for these features to work, you’ll have to set them up. Here’s how to prepare your iPhone for emergencies.
Create a medical ID on your iPhone
In the event of an accident, it’s vital for first responders to be familiar with the patient’s medical history so that they can treat them accordingly. This information, however, is not always immediately available on the site of an incident — unless you have set up a “Medical ID” on your iPhone.
With “Medical ID,” you can allow anyone to read your essential medical details, such as your blood group, allergies and medications — right from the lock-screen without unlocking your phone. It can also include your emergency contacts and their relationship to you.
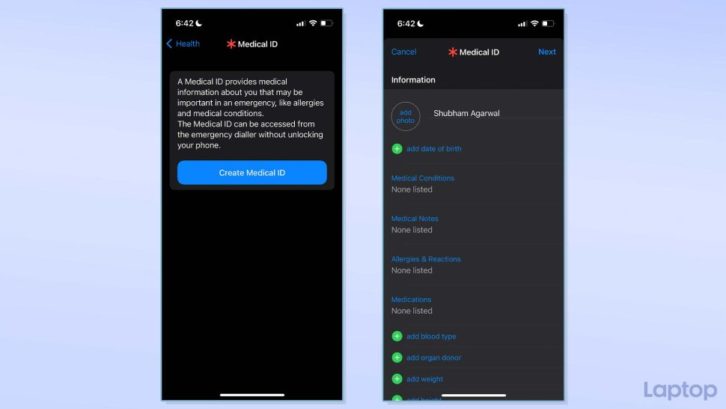
To set up a Medical ID on your iPhone, go to Settings > Health > Medical ID and tap “Create Medical ID.” On the next page, you’ll have a series of text fields to add whatever information you want to show in your Medical ID. Punch in the fields you think will be helpful for first responders in an emergency, such as your family contacts and health conditions. If there’s information you want to enter, but can’t find the relevant entry field for it, submit it under “Medical Notes.”
Lastly, toggle on the “Show When Locked” switch to ensure people can access this information from your iPhone’s lock-screen. Hit “Next” at the top-right corner and then “Done” to save.
Now, once a person fails to unlock your iPhone through Face ID and Touch ID, they can access your medical information under Emergency > Medical ID on the PIN prompt.
Activate SOS on your iPhone
Your iPhone can also send an SOS to the local emergency number and your emergency contacts. You don’t have to fuss around with any menus to use it, and you can trigger it by pressing your iPhone’s lock button three times. When you do that, your phone not only alerts the emergency helpline, but even sends your location to your contacts and tells them when it changes.
For enabling SOS on your iPhone, head over to Settings > Emergency SOS.
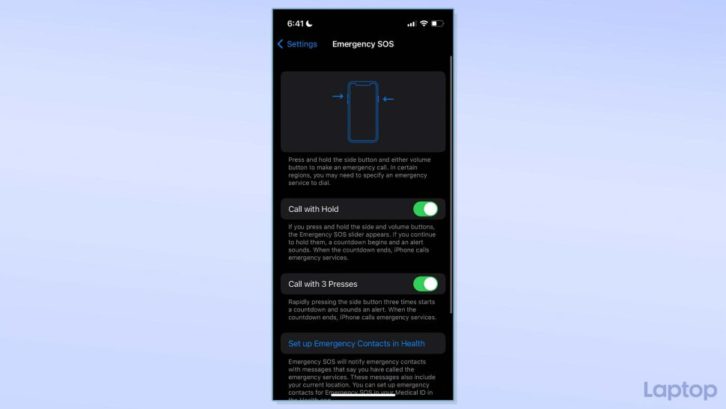
There are two ways you can send an emergency SOS from your iPhone. You can rapidly press the power key three times to kickstart an 8-second countdown; this will prompt your iPhone to automatically call emergency services. Enable this with the “Call with 3 Presses” option. Alternatively, the “Call with Hold” toggle lets you press and hold power, and any volume buttons, for a few seconds to beam an SOS. You can keep both of them switched on or stick to the most convenient one for you.
When you set off SOS on your iPhone, it can also play a loud warning sound to capture the attention of a passerby. You can choose to enable this with the “Countdown Sound” toggle at the bottom of the page.
The emergency number your iPhone dials depends on where you live. In the United States, for instance, it will call 911, but in some regions like China, you’re asked to pick between police, fire, or ambulance.
Share your iPhone’s location with friends and families
Another quick method to ensure someone’s always able to look over you is to indefinitely share your iPhone’s live location with your closest friends and families. You can easily do this with the Find My app on your iPhone.
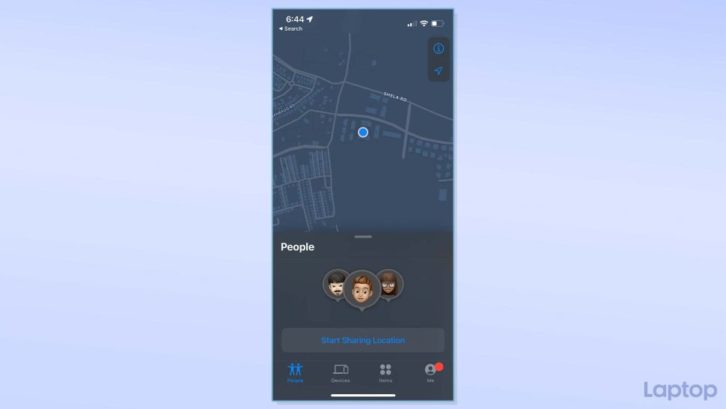
Open Find My and in the “People” tab and tap “Start Sharing Location.” Look for the contact’s profile, touch it and select “Send” at the top right corner. Tap “Share Indefinitely” on the following prompt, and you’re all set.
Keep your iPhone traceable after it’s shut off
If you own an iPhone 11 or later with iOS 15 running, your phone can remain findable even when powered off. This can come in handy when you run out of battery in unfamiliar territory, as your loved one would still be able to see where you are.
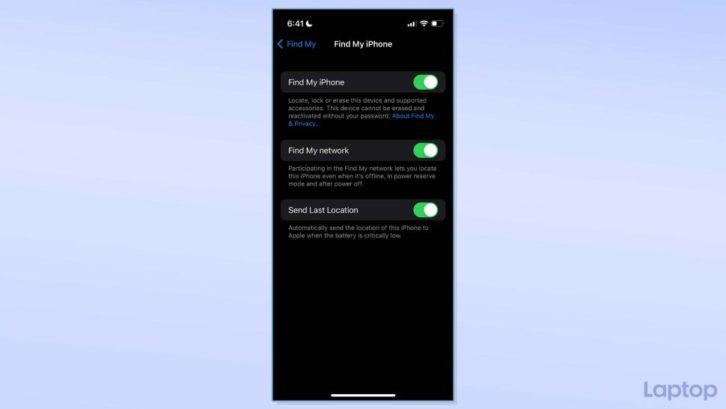
Navigate to Settings > [Your Apple ID Name at the top] > Find My > Find My iPhone. Turn on all the three options on this page.
Verify that your iPhone is findable when it’s off by pressing and holding power and volume down keys. You should have an “iPhone Findable After Power Off” note under the power slider.
Prepare your iPhone for emergencies with apps
Apart from your iPhone’s built-in tools, you should have a couple of apps in your arsenal to be better prepared in emergencies.
American Red Cross’s First Aid app offers simple step-to-step instructions for what you can do in a range of incidents, such as an asthma attack, stroke and more — even without an internet connection. It’s also integrated with the 911 system so that you can call emergency medical services right from the app.
https://www.youtube.com/watch?v=G27GaFnoCio
Apple’s iPhones don’t yet come equipped with the ability to detect a car crash like Google’s Android phones. GM’s OnStar Guardian app patches that hole, and it works for all sorts of vehicles. Once it’s up and running, the app calls for help as soon as it detects a car crash. It costs $15 a month after a 3-month trial and is only available in the United States and Canada at the time of writing.
This article originally appeared on laptopmag.com.
About the Author
Shubham Agarwal is a freelance technology journalist from Ahmedabad, India. His work has previously appeared in Business Insider, Fast Company, HuffPost, and more. You can reach out to him on Twitter.
See also: Apple iPhone Subscription — Here’s How Much It Could Cost


